Integrate with GitHub Enterprise Server
Support level: Community
What is GitHub Enterprise Server?
GitHub Enterprise Server is GitHub's self-hosted product for running repositories, collaboration, and enterprise user management inside an organization’s own infrastructure.
Preparation
The following placeholders are used in this guide:
github.companyis the FQDN of the GitHub Enterprise Server installation.authentik.companyis the FQDN of the authentik installation.
This documentation lists only the settings that you need to change from their default values. Be aware that any changes other than those explicitly mentioned in this guide could cause issues accessing your application.
GitHub Enterprise Server requires SAML authentication before you can enable SCIM provisioning. If you configure SCIM, the authentik worker must be able to reach https://github.company on TCP port 443, and every user in the provisioning scope must have a valid email address in authentik.
Use authentik as the only system that writes to the GitHub Enterprise Server SCIM API. Writes from another identity provider or an administrative script can make authentik's record of the remote users and groups incorrect.
Removing a provisioned user from the application's access scope causes authentik to send a DELETE request during the next full sync. GitHub Enterprise Server treats this as hard deprovisioning, which permanently suspends the account and cannot be reversed.
authentik configuration
Create a SAML application/provider pair. To add SCIM provisioning, also create a GitHub-specific SCIM user mapping and define which users can access the application.
Create an application and provider
authentik 2026.5 introduces changes to how the SAML provider behaves. Specifically, the provider now automatically sets the Issuer value to: https://authentik.company/application/saml/<application_slug>/metadata/
Older versions of authentik set this value to authentik by default. If you're running an older version, please set Issuer to https://authentik.company/application/saml/<application_slug>/metadata/, where <application_slug> is the slug that you selected for the application.
- Log in to authentik as an administrator and open the authentik Admin interface.
- Navigate to Applications > Applications and click New Application to create an application and provider pair. (Alternatively you can first create a provider separately, then create the application and connect it with the provider.)
- Application: provide a descriptive name, an optional group for the type of application, the policy engine mode, and optional UI settings. Note the application Slug, because it is required later.
- Choose a Provider type: select SAML Provider.
- Configure the Provider: provide a name, select an authorization flow, and configure the following settings:
- ACS URL:
https://github.company/saml/consume - Audience:
https://github.company - Under Advanced protocol settings:
- Select a Signing certificate and download the certificate for use in GitHub Enterprise Server.
- Set Property mappings to
authentik default SAML Mapping: Username,authentik default SAML Mapping: Email, andauthentik default SAML Mapping: Name. - Set NameID Property Mapping to
authentik default SAML Mapping: Username.
- ACS URL:
- Configure Bindings:
- For SAML without SCIM, bindings are optional and control who can access the application.
- For SCIM, add at least one user, group, or policy binding that selects every user who should be provisioned. If the application has no bindings, authentik includes all users in the provisioning scope.
- Click Submit.
Create an administrator entitlement (optional)
Create this entitlement if you want SCIM to assign the GitHub Enterprise Server enterprise owner role. Users in the application's access scope who do not receive this entitlement are provisioned with the standard user role.
- Open the GitHub Enterprise Server application in the authentik Admin interface.
- Click the Application entitlements tab.
- Create an entitlement named
GitHub Admins. - Open the entitlement and bind the users or groups that should become enterprise owners.
Create a SCIM user property mapping (optional)
Complete this section if you want to use SCIM provisioning. This mapping sends the fields that GitHub Enterprise Server requires and reads the administrator entitlement from the application that owns the backchannel provider.
-
Navigate to Customization > Property Mappings and click Create.
-
Select SCIM Provider Mapping and click Next.
-
Configure the following settings:
-
Name:
GitHub Enterprise Server user -
Expression:
if not request.user.email:raise ValueError("GitHub Enterprise Server requires a user email address")formatted = request.user.name or request.user.usernamegiven_name, separator, family_name = formatted.partition(" ")if not separator:family_name = " "entitlement_names = {entitlement.namefor entitlement in request.user.app_entitlements(provider.backchannel_application)}role = "enterprise_owner" if "GitHub Admins" in entitlement_names else "user"return {"userName": request.user.username,"externalId": str(request.user.uid),"name": {"formatted": formatted,"givenName": given_name,"familyName": family_name,},"displayName": formatted,"active": request.user.is_active,"emails": [{"value": request.user.email,"type": "work","primary": True,}],"roles": [{"value": role,"primary": True,}],}
-
-
Click Finish.
GitHub Enterprise Server configuration
Configure SAML
- Open the GitHub Enterprise Server Management Console at
https://github.company:8443and sign in as an administrator. - Navigate to Authentication and select SAML.
- Configure the following settings:
- Single sign-on URL: enter the SAML Endpoint from the authentik SAML provider.
- Issuer:
https://authentik.company/application/saml/<application_slug>/metadata/ - Signature method and Digest method: select the methods that match the authentik SAML provider.
- Verification certificate: upload the signing certificate that you downloaded from authentik.
- If you plan to use SCIM, select Allow creation of accounts with built-in authentication and Disable administrator demotion/promotion. These settings let you create the required setup user before SCIM manages accounts.
- Under User attributes, configure the following SAML attribute names:
- Username:
http://schemas.goauthentik.io/2021/02/saml/username - Full name:
http://schemas.xmlsoap.org/ws/2005/05/identity/claims/name - Emails:
http://schemas.xmlsoap.org/ws/2005/05/identity/claims/emailaddress
- Username:
- Click Save settings and wait for the changes to apply.
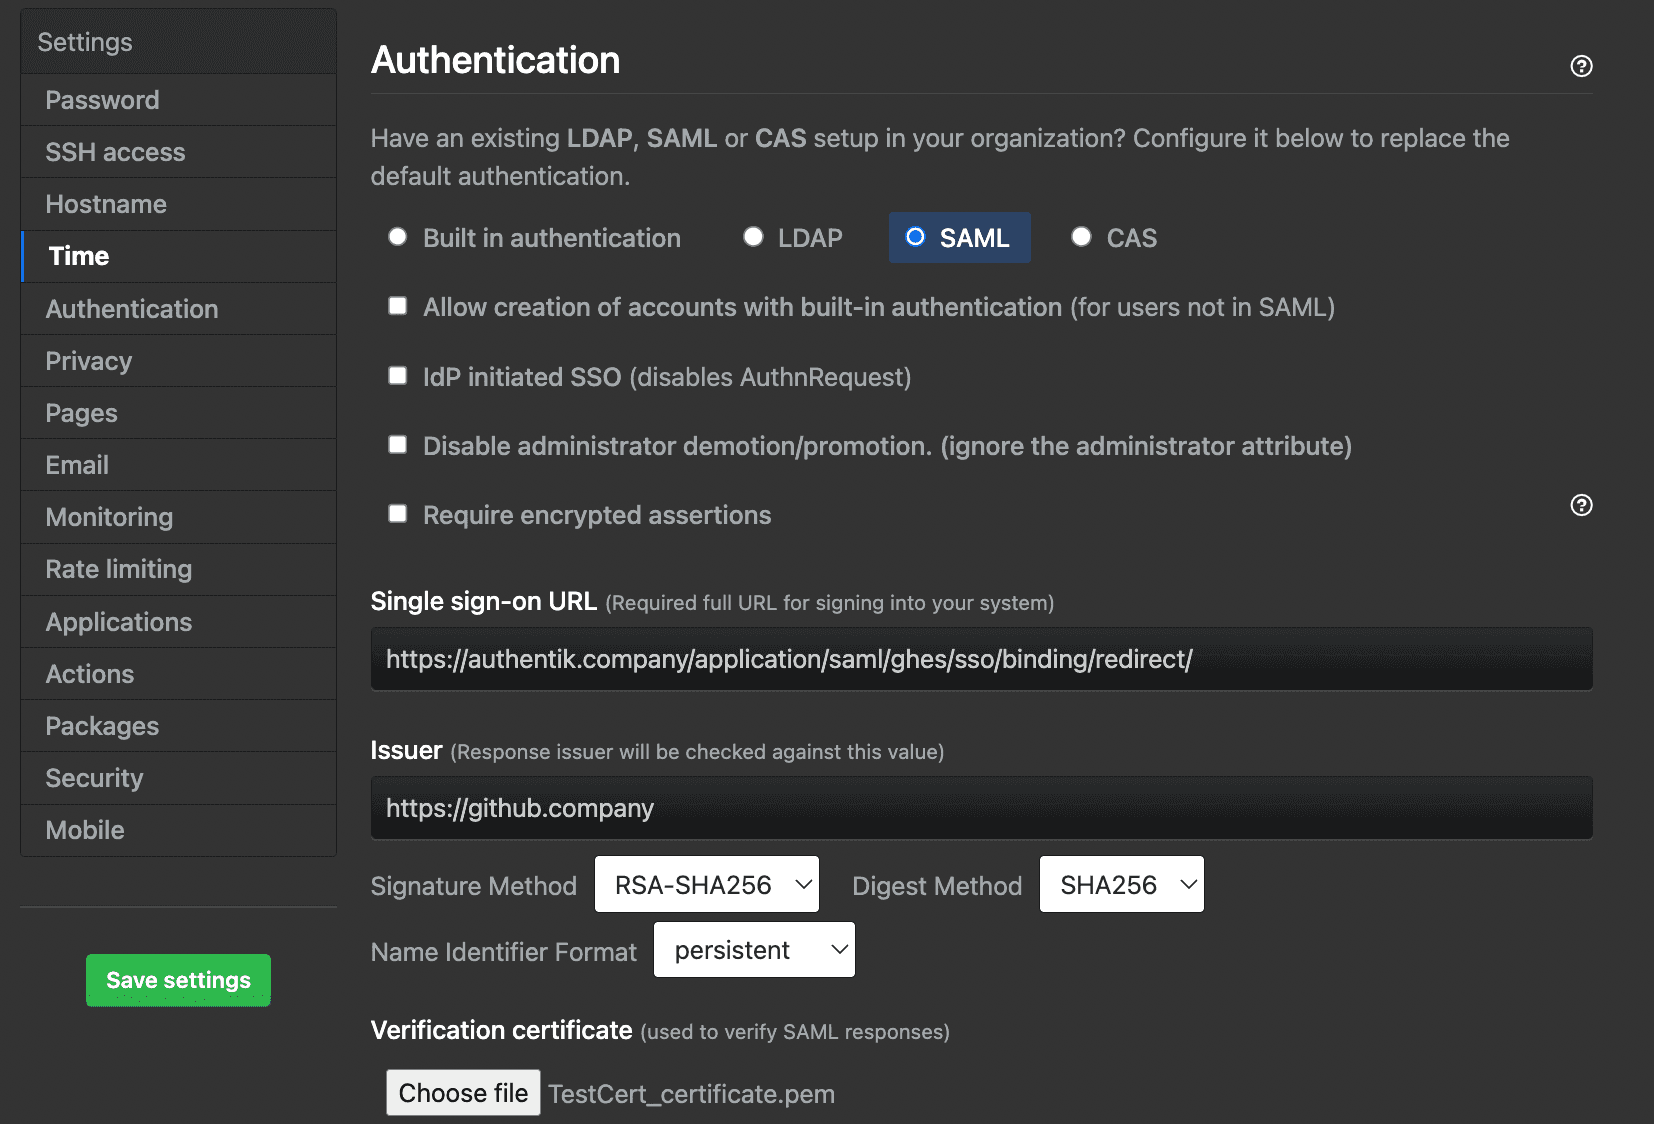
After configuring SAML, you can allow local authentication by selecting the Allow creation of accounts with built-in authentication (for users not in SAML) checkbox. This can have security implications when self-registration is enabled.
Create a SCIM setup user and token (optional)
Complete this section if you want to use SCIM provisioning.
- Create a built-in user named
scim-admin. Use a username and email address that are not assigned to an account that authentik will provision. - Set a password for the user and promote the user to enterprise owner. Store the credentials as a break-glass account.
- Sign in to GitHub Enterprise Server as
scim-adminand openhttps://github.company/settings/tokens. - Create a personal access token (classic) with only the
scim:enterprisescope and no expiration. - Store the token securely. You will add it to the authentik SCIM provider.
Enable SCIM (optional)
- Sign in to GitHub Enterprise Server as
scim-admin. - In the upper-right corner, click your profile picture, then click Enterprise settings.
- Click Settings > Authentication security.
- Under SCIM Configuration, select Enable SCIM configuration.
- Confirm that the enterprise audit log contains a
business.enable_open_scimevent.
Create a SCIM provider in authentik (optional)
- In the authentik Admin interface, navigate to Applications > Providers and click Create.
- Select SCIM Provider and click Next.
- Configure the following settings:
- Name: provide a descriptive name.
- URL:
https://github.company/api/v3/scim/v2 - Token: paste the personal access token that you created as
scim-admin. - User Property Mappings: remove
authentik default SCIM Mapping: User, then addGitHub Enterprise Server user. - Group Property Mappings: remove all selected mappings. Configure group provisioning separately if you use GitHub Enterprise Server identity provider groups to manage organization and team membership.
- Click Finish.
- Navigate to Applications > Applications and open the GitHub Enterprise Server application.
- Add the SCIM provider to Backchannel Providers.
- Click Update.
Update GitHub Enterprise Server settings (optional)
Complete this section after the first SCIM sync succeeds.
- Open the GitHub Enterprise Server Management Console at
https://github.company:8443and sign in as an administrator. - Navigate to Authentication.
- Clear Disable administrator demotion/promotion so that SCIM can assign and remove the enterprise owner role.
- To require authentik to provision every non-setup account, clear Allow creation of accounts with built-in authentication.
- Click Save settings and wait for the changes to apply.
Configuration verification
To verify SAML authentication, sign out of GitHub Enterprise Server and open it again. GitHub Enterprise Server should redirect you to authentik.
To verify SCIM provisioning:
- Create or choose a test user in authentik with a username, name, and email address.
- Ensure that the test user matches an application binding for the GitHub Enterprise Server application. To test the enterprise owner role, also assign the
GitHub Adminsentitlement. - Open the SCIM provider and click Run sync again.
- Confirm that the sync task succeeds and that GitHub Enterprise Server contains the provisioned user.
- In the GitHub Enterprise Server audit log, search for
action:external_identity.provision user:<username>. - Sign in as the test user and confirm that GitHub Enterprise Server links the SAML login to the provisioned SCIM identity.
Diagnose SCIM synchronization failures
Some SCIM HTTP errors can appear in an authentik task as the following generic message:
Failed to sync <username> due to transient error: Network error communicating with remote system
This message does not prove that the connection failed. Check both systems at the same timestamp:
- In the authentik worker logs, find the
Failed to send SCIM requestentry. It contains the response body returned by GitHub Enterprise Server. - In the GitHub Enterprise Server audit log, search for
action:external_identity.scim_api_failure. The event contains the request status, payload, and error message. - For a
400response, confirm that the user has an email address and that the SCIM provider uses only theGitHub Enterprise Server usermapping. For a401or403response, confirm that the token belongs to the built-in setup user, has thescim:enterprisescope, and that the audit log containsbusiness.enable_open_scim.
Resources
- GitHub Enterprise Server: configuring SAML single sign-on for your enterprise
- GitHub Enterprise Server: SAML configuration reference
- GitHub Enterprise Server: configuring SCIM provisioning to manage users
- GitHub Enterprise Server: provisioning users and groups with SCIM using the REST API
- GitHub Enterprise Server: REST API endpoints for SCIM